Blog Post 9: Artists organize and develop artistic ideas

When making the sketches for the Greek vessels, I used examples from Greek vassals. I had to make sketches that resembled the forms of old Greek vassals. For this project, I made a vase that curved out at the lips. It closely resembles the vase in Picture 1. In Picture 1 the vase demonstrates the curved lips. After making my sketches (Picture 2), I drew two lines – one from the base of the object, one from the lips of the object – that would help me to get the idea for making the template (Picture 3). The template was able to hep guide me when making the pot. This was all because of the sketches. I made the base thick and and narrow. I made the object so it was thick at the bottom, and kept this form when making the top of the pot. When making the pot, I had to score the object to get rid of cracks and I hit the object with the paddle to give the object it’s necessary shape. Even before I started the pot, I had to make changes to the drawings. I had to make sure the pot had a stable base and even walls. I also had to be sure that the lips were even and curved out enough. I had to make the drawings accurately to form the object.

Picture 1 exemplifies the curved lips that I attempted to incorporate into my artwork.

Picture 2 presents my sketches. As stated before, the parallel lines at the lip and base of the artwork are used to help me form the shape of the template.

Picture 3 shows the template that I used to make the artwork. The template is used to give the artwork the same shape found in the sketches.

Blog Post #9: Artists develop and refine their techniques

There were a series of methods and processes that I am using to create the vessel form. The first step was to make a circular base. This was done by cutting out a circular base from a slab roll.  From there, I made a series of coils and connected them to form the vase (Picture 1). Making the coils required me to stand up and roll the coils out. By making the coils this way, the slabs were better structured and they did not roll out like pizza dough. When making the slabs, I had to make certain changes to make sure that the object was not deviating from the template that I made from cardboard (Picture 2). Cutting out the template required me to draw out the outline and make it fit the template. The process of making this object resulted in me having to strengthen the methods used in creating artwork. Forming the coils took practice and many of the coils were being flattened out. After practicing several times, I was able to make coils that were appropriate for the object. To refine the project, I may use a paddle to make the form concur with the template. I will also use the serrated edge scrapper and the rubber rib to smooth out all cracks. The scrapers were also used to stick the coils to the edges of the project (Picture 3).

Picture 1 exemplifies the way I made the coils. I had to scrape the coils and the lips to form a good connection. Once I finished this, I had to continue to smooth the vase.

Picture 2 shows the cardboard template I made from the sketches. In order to make the coils form the structure I wanted it to form, I had to make sure that the coils were aligned with the template.

Picture 3 shows the tools that were involved in making the vase. The rubber rim and the serrated scraper were key tools in making the coils and including them on the vase. The paddle was used to form the shape of the vase.

Blog Post #8: Greek Vessels

When performing research on Greek vessels, I read about several Greek vessels. One of the vessels I researched was the Terracotta Hadra Hydria. It is a Hellenistic vase that was created around 3rd Century B.C. It was designed to be a water jar. When looking at the vase, it can be noted how the large body makes the vase a great tool for storing large quantities of water. The large handles and extended lips makes it easier to carry if someone needed to transport the vase or water plants. The vase is designed with stripes. The stripes are in the shape of vines and line stripes. This can represent the form of plants in that time and possibly the agriculture of the region. The artist used a dark iron form of embellishment, where the stripes and leaves are of iron color and texture, and the rest of the vase is a pink color due to the firing. The vase has a small base, and the vase has a large body used to store a lot of water. At the top, the lips are small and curved out. The pot exhibits the same geometric shape that is used to form many Greek artifacts.

Another vase I researched was the Glass Alabastra. The object was made in the 2nd to 1st century B.C. It was designed to store perfume. The long body suggest that the object could be used to store quantities of perfume that could be transported from place to place. The object was designed with stripes as it’s embellishments. In Greek artwork, stripes were the common embellishment. The artwork is black with white stripes. The object is a black figure with a narrow geometric body.

It is important for institutions like The Metropolitan Museum of Art to conserve and exhibit works from ancient cultures because the artwork can give insight on the lives of people living in ancient society. They can also give insight to the beliefs and the stories that are shared within ancient societies. For example, in the battle vase, one can see the armor and the battle tactics used in ancient Greece. The details on the shield and the soldiers’ armor describes the heavy equipment used in battle. Other types of vases will show the Greek gods, a household, or famous places that shows the development of Greek society. By protecting these pieces, researchers are able to get a sense of Greek society and how the people from the ancient world made art and used it to paint a picture of their daily lives.

https://www.metmuseum.org/art/metpublications/Ancient_Art_from_Cyprus_The_Cesnola_Collection_in_The_Metropolitan_Museum_of_Art


Blog Post 7: Artist Communicate

When making the artwork “Couch Potato”, I created a couch to represent the meaning of the idiom, which is laziness. I used slab building to create the form of the couch by connecting two slabs together and then using clay to form couch cushions. Then, I added arm rests to each side of the couch with a lot of clay. Finally, I made a spherical clay form to use it as a potato. Creating the couch and the potato serves to communicate laziness. Other members of my group suggested that I make the slabs smaller to make the couch a normal size couch instead of making it too big and unable to be qualified as a couch. They also suggested that I create the potato to complete the idiom representation and to further express the idea of laziness. A person also recommended that I carve out space from the bottom of the artwork to make it more hallow. I accomplished this with the loop tool.  The potato expresses laziness because it is an object that does not move or do anything; The couch expresses laziness because it is a household object that is used when people want to be lazy or want to rest. These elements represent the main image of laziness that the idiom wants to established.


This was the final form of the couch and the potato.


Using slab building, I was able to create the form of the couch. Then, I formed the couch cushion from clay.


Using the loop tool allowed me to make the sides of the couch hollow.

Blog Post #7- Artists Observe

Patti Warashina is the artist responsible for the artwork “Censored”. In the artwork, there are two heads with different lights on their heads and black paint covering the mouth, eyes, and ears. After looking at the artwork, I believe that the artist is communicating the idea that people of different levels of intelligence are known to be censored and unable to communicate their ideas. In the artwork (Picture 1), the artist has black paint over the mouth of one of the heads. This can be interpreted as a person not being allowed to speak their mind. An example of this could be a person who speaks against a form of government. One of the heads has their eyes covered, which could represent someone who is not allowed to see something. The head whose ears are covered represents the failure or inability to hear. When looking at the different lights on the top of the heads, I believe that the type of censorship is dependent on the intelligence level of the heads. The head whose eyes are covered as the longest light on the top of it’s head. Noticing this gave me the idea that the censorship is based on intelligence.

Semester Portfolio

The coil bowl is my favorite piece because I felt that I had spent more time on it then the others. It took a while for me to master coiling. While creating the bowl, I had issues with the technique, mainly because the lips and sides of my bowl were weak and unstable. Another issue that I faced was keeping the lips at a even point. I also had to deal with many cracks, especially when the lips and sides of the bowl would tear apart because of the lack of support. After facing all these challenges, it was pleasing when I was able to apply enough clay to create strong lips and strong foundations. I was also pleased with the embellishment; adding squares around the side of the bowl. I was also pleased with the color choices I used. The blue in the cracks from the squares, the yellow spots in the middle of the squares, and the orange around the entire bowl gives a warm color that is pleasing to the eye. I felt like this project had a lot of challenges and required me to use the methods of pinching and coiling to complete the bowl and learn the new skill.

Blog Post 6- 4 Step Explanation Experiencing Clay page 90-91 Teressa Riney Pot

Describe

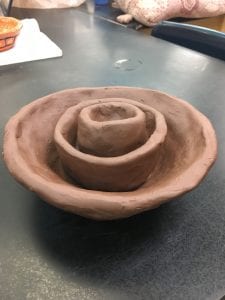
This pot was made by Teressa Riney. It was made using the pinching method along with opening the dome, a process that involves creating an opening in the clay. The clay is curved to form a dome to a particular height. Then the clay is pressed down and out from the center (picture 3). From there, it involves making a smooth base. It was made using slip clay, or any clay that has moisture and can be mobile. The pot was embellished with a brown glaze along with a white, shiny glaze. Picture 1 shows the contrasting colors that gives the copper pot it’s color.


Analyze

The elements are organized to form a balanced presentation. For example, the dome method leads to the pot having a stable base, which is curved as you progress to the top of the pot (this can be seen in both picture 1 and 2). This gives the pot balance. The way the artist chose the colors creates an emphasis. The dark colors with the light colors gives a sense of unity. The different colors work together to give unity to the pot. The artwork also has equal proportion to add to the balance. It is evident that the artist spent significant time in making sure the sides around the pot are even and that one side was not bigger then the other. This is also seen at the formation of the lips of the pot. The lips of the pot are not made uneven. They are well formed so they are not uneven. The elements together form a unity to the artwork and forms a unique object.


Interpret

I would assume that the artist is communicating the message that opposites attract to form something great. When looking at the artwork, you are looking at brown copper with luster glaze. These are two completely different colors. However, when added together, they form a great embellishment. I would assume that the artist is also creating a pot using similarities. When looking at the mouth and base of the pot, one can see that they are the same size. This could be the artist’s way of showing similarities to create an object.


Evaluate

Overall, I would consider the artwork successful. The form of the artwork was well executed. It can be seen that the pot has been smoothed out to form a curve as the pot gets taller. It was smoothed out and given the appropriate amount of attention so that the curves of the pot are made so they are uneven. The design is also successful. The use of copper matte with luster glaze is used on the pot to get the two contrasting colors to form a harmonious embellishment. The artist connects a feeling of unity with all the pieces coming together with the use of contrasting colors, making the base and lips equal size, and creating a smooth curve for the pot.

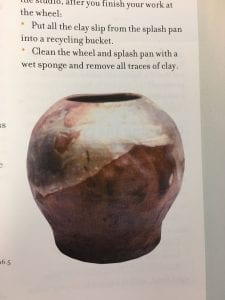
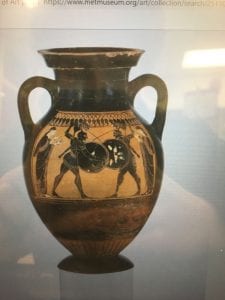
Picture 1 is Teressa Riney’s pot. It is made with copper mette with luster glaze. The pot’s mouth and base it the same size and it has two contrasting colors as it’s embellishments.

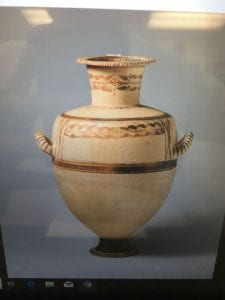
Picture 2 serves as an example to the curve form that is used in Teressa Riney’s artwork.

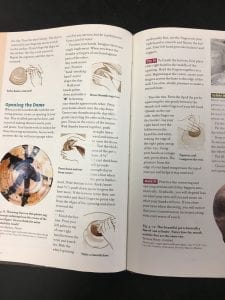
From picture 3, one can see the hand motions used in the opening the dome. It involves bracing the thumbs together, pressing down and out from the center, making a smooth base, and squeezing and compressing the rim.


This form was found in the “Experience Clay” textbook on pages 90-91.


Blog 5-Tools and Materials

Throughout making the soap dish, I used several tools to create the craft. Some of the tools were new to me. I use tools to cut, smooth, and shape clay in order to create specific objects. For example, the use of the serrated scraper and the rubber rib serve to smooth out the clay and to get rid of any cracks that could ruin the project. Another example is when I used the fettling knife for the first time. Using the fettling knife required me to carefully cut out pieces of clay with the templates. I store the basic tools in the Purple bin in the front of the class. This keeps the tools protected from any danger. The basic tools include the serrated scraper, loop tool, modeling tool, rubber rim, and the cut-off wire. The fettling knife is stored at the front of the class, with labeled spaces for them. Maintaining these knives is important because they could present danger to others around me. While the fettling knife is not sharp, it can still be dangerous when not used properly. All of the tools used can be dangerous to other people. For this reason, it is important to use them carefully and to maintain them. Maintaining these tools are also important because if they are not properly maintained, they will not be effective for future use. It is necessary to keep tools safe so they can be effective for everyone. To prevent any injuries, I learned a few procedures that pertained to tools. One procedure I learned was the process of signing my name to make it known that I had taken one of the fettling knives. After using the fettling knife, I crossed my name out to show that I was finished using the knife and that the knife was returned to its place. By learning procedures such as this, all materials are returned and they are kept safe for others to use.

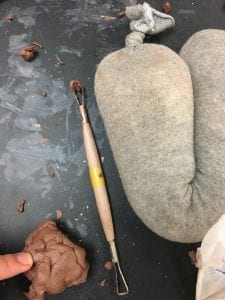
                                                                                              When a fettling knife is needed, everyone is required to sign in when they are using it, and sign out once the knife is returned.

                                                                                            The basic tools are kept in the plastic bin so they are preserve and protected for other people.

                                                                             All the basic tools such as the loop tool, the modeling too, the serrated scrapers, and the rubber rib are kept in a bin before placed in the plastic bin.


Blog Post 5-Develop Craft

When creating the soap dish, I had to follow a series of steps to create the form using stiff slabs. First, I received clay from the pug mill. I had to start out by wedging and flattening the clay at the back table. This involved picking up the clay and throwing it down several times. After doing this, I took the clay to the slab roller to flatten it some more. Using the slab roller was a new experience for me. To use it, I had to lay the slab on a paper surface. Then I wrapped the clothe on the slab roller so that it could cover the slab of clay. After rolling the slab through the slab roller, I had to flip it and retrieve it from the clothe. Once I was finished with the slab roller, I moved on to use templates to cut out each slab using a fettling knife. Like the slab roller, the fettling knife was also a new tool for me; however, it was a simple tool to master. It is a knife that is used to cut clay, and in this case, I used the knife to cut out the templates. Once I cut out the new slabs, I layered them between newspapers. I folded the newspaper so it fitted on the ware board. The slabs were much harder in texture. I scored the slabs with the serrated scraper and then smoothed them out with a scraper and with the rubber rib, which offered the same results as the scraper. It was my first time using the rubber rib. Then, I applied slip, which was a liquid clay that dried up to form solid. I used this to connect the slabs together. Before I connected the slabs, however, I made sure that the slabs were smoothed out and straightened. I used slip and extra clay to make sure that the slabs were solid and firm. I made sure to go slow and place one wall at a time, smoothing them out and applying slip to assure the firmness of the object. This project required the use of dry clay, which makes it difficult to move the clay. Soft clay is usually easy to manage and can easily be applied to an object (creating an object or rubbing soft clay in to smooth out cracks or enlarge the sides of the object). I found that although soft clay is easier to handle, the hard clay was better when creating strong foundations for an object. Using hard clay introduced me to this new way of constructing clay. Hard clay required me to stack the slabs together and reinforce it with slip. I saw that the object was much more secure then if soft clay were used.

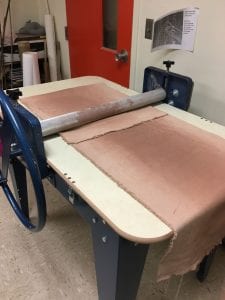
                                                                                          After wedging and flattening the clay at the back table, the clay was then rolled through the slab roller, which caused the clay to be flat enough to cut out the templates.

After setting up all the slab pieces and building the slabs, this was how the soap dish was formed. It was formed in a three-denominational rectangle that is able to hold the soap.

A big factor in forming the soap dish was the use of slip, which is liquid clay used like glue. I used this to connect the walls and the bases together.

Blog 4- Sketch and Explore

When creating the toothbrush holder, I experimented with applique for the first time. After I had smoothed out the toothbrush holder, I had decided to use applique by adding a palm tree as the embellishment. Putting this embellishment on required me to secure the embellishment on the object and to constantly smooth it out so that there were no clay pieces that would form into little rocks after the bisque firing. I realized that adding an applique required a lot of attention to detail and to be sure that the embellishment will not fall off during the bisque firing. The artwork will require me to be slow and precise when adding the glaze on the palm tree. This addition also required me to use incising to make the leaves of the trees stick out as well. The applique tree design makes the artwork stand out and makes the overall presentation of the artwork better.